Skin Colour and Photography
People like to talk a lot about different styles of photography but skin colour and photography isn’t as widely discussed. And that bothers me. I’ve seen too many instances, both in media and by personal professional photographers that I wanted to talk about it. Full disclosure: I am the kind of white person you lose in a snowstorm, but I also have a background in Sociology and Anthropology and a lot of thoughts about photography as a tool, both in terms of how it can more accurately reflect our world back to us or how it can distort it, even changing how we see ourselves and each other.
Racism, Colourism, and What Even Is That?
Racism and Colourism: What’s the Difference?
Racism: It’s prejudice plus power. It’s not just slurs or Civil War Participation Trophies, it’s a whole mess of behaviours and mindsets. Read up and sit with it before you email me (and then don’t email me).
Colourism: It’s the conscious or unconscious favouring of lighter skin tones. It’s an insidious facet of racism that devalues darker skin (all non-white skin tones but most especially black and brown) and is tied to — you guessed it! — white supremacy. It’s in everything and it’s everywhere. There’s skin whitening products in India where a majority of people have darker skin (it’s worth clicking the link on this one. The stock photo they use might surprise you! (it probably won’t)). There’s skin whitening components in all my skin care products from Asia. On the flipside, white people get to tan to be fashionable and decide they wanna be dark and it’s cool but people with more melanin in their skin don’t get that choice or that luxury.
What’s the Difference?: Colourism is a facet of racism (I just said that) and when we engage in colourism, we’re engaging in racism. It’s something about which we need to be incredibly vigilant when we — especially we white photographers — edit photos with BIPOC in them. This all comes back to impact versus intent, and it’s something I’m going to harp on throughout this post: we may not mean to do it, but we may still do it. In the end, our intent doesn’t matter if our impact is still racist, whether that’s highkey or lowkey racism. And as we work with a diverse client base, we need to be extra conscious of how we’re not only editing but how we’re capturing our subjects. We need to be aware of colourism and how easy it is to do it — consciously or unconsciously. For me, I’m acutely aware of colourism and it’s something I actively work against. We’ll get into how you can avoid engaging in colourism but first, some concrete examples.
The Nitty-Gritty
Examples of Colourism in Editing — OR, Cautionary Tales

image credits: atlanta black star
Lupita Nyong’o: As you can very clearly see from the red carpet photo (or if you’ve watched a movie in the past 10 years), Lupita Nyong’o is a very dark-skinned Black woman. In editing this shoot for Vanity Fair, the photographer lightened both everything around Lupita and Lupita herself. In doing so, he brought her skin colour up about 5 shades and made her look much lighter than she actually is.

image credits: atlanta black star
Beyonce: We all know what Beyonce looks like, but apparently L’Oreal does not (haha jk they totally do and this is a thing beauty brands do to BIPOC women all the time). I think we can all look at this and agree it’s pretty egregious.

image credits: omona they didn’t
Yoona & Kai: Even fans can engage in whitewashing. It’s a(n unfortunately) common occurrence in K-Pop to have foreign fans editing images of idols and making them look loads whiter than they do in real life. Whether or not the fans realize it, they’re still engaging in colourism, a real problem in places like Korea.
Editing Better
OR, “What Does This Mean For Me?”
I needed to show you these examples of colourism so that you could get an idea of what we’re working with in photography and what we’re working against. Now, I’m going to walk you through some ways you can photograph your subjects better from the second you snap that shutter to when you finish editing.
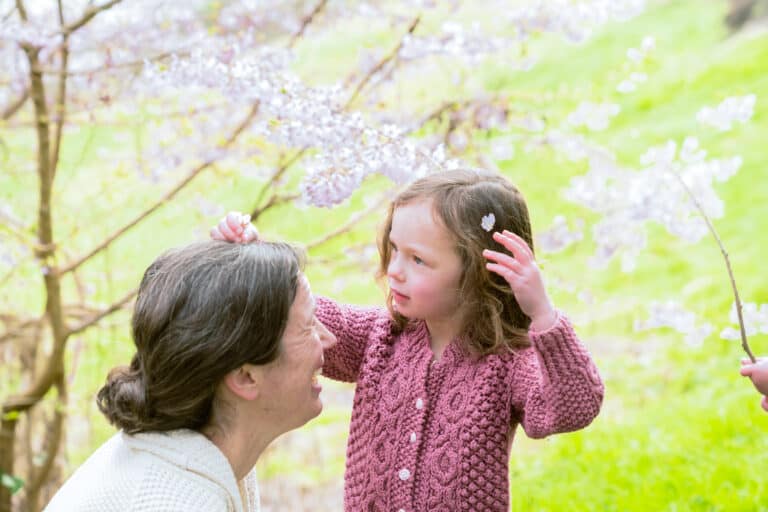
Let’s use these two little sisters as an example:

sooc: f/6.3, 1/100, iso250. purposely underexposed more than usual here

first pass editing: apply presets, adjust temperature and colour correct

final image: applied radial filter to brighten background and preserve subjects
Differences in Skin Tones: Notice them. You should already do this, but be extra aware of how lighting looks on skin with more melanin if you’re used to working with people whose skin has less melanin.
Shoot RAW, Shoot in Manual: You should already be doing this, especially if people are paying you for photography. Shooting RAW saves everything the sensor collects whereas .JPG is a compressed format; you’ve already lost some of the image the second it’s written on the memory card when you shoot .JPG. When you shoot RAW, you maintain better control over the editing process. Shooting in manual allows you that same control, but it’s over how the image is captured. Get comfortable with it.
Expose Correctly: On this particular day, it was incredibly grey and rainy (literally through the first 10 minutes of our session). I took extra time when we started to do test shots with each little girl’s skin so I could flip back and forth easily and make sure I wasn’t going to lighten or darken either too much. This was shot at f/6.3, which is a little darker than I tend to shoot for family shoots, but I deliberately underexposed even more than usual to preserve each girl’s skin and hair tones for editing. This also helped me preserve the background, but in this case, I was exposing for my subjects — specifically, the little Black girl. I know a lot of y’all like to shoot wide open or ~dark and moody~ and while I have some thoughts about that that I will save for later, I will say that when you shoot wide open or shoot too dark, you’re already distorting the image the second it gets captured in the camera. Underexpose always. You can always edit in Lightroom.
Mind The Presets, Know What the Sliders Do: If you’re someone who uses presets someone else made, be aware that they were very likely not developed using darker skin tones. This is a time where you might accidentally lighten someone’s skin tone too much without really realizing it. Even if you’re using your own presets, you still need to be able to tweak things for each individual shoot. In this case, I spent extra time minding the highlights and shadows on my first pass, and then the tone curve on the second pass. If it’s helpful, use before and after view in Lightroom so you can see exactly what you’re editing as you move the sliders about.
Employ Other Methods: I don’t know about you, but I deal with grey days a lot here in the PNW. And as an adventure photographer, I like my background to be a part of the story of the photo. This goes right back to my previous point about exposing correctly. Exposing for the background can mean losing my subject in the foreground, or I can expose for my subject and blow out the background. In a case like this photo, I underexposed for my subject and then went in in Lightroom and added a radial filter to even out the background while preserving the little girls in the foreground. Radial filters are your friend, use them. Challenge mode: photo merge.
Takeaways
OR, “What Now?”
I hope most of these things, particularly when it comes to shooting and editing, are things you already do, but I do genuinely hope you learned at least one or two new things from this post. As you go back out there, challenge yourself to be more conscious of skin tones, how many different shades there are, and how you as a photographer are preserving them. As photographers, our job is to reflect back to people what it is they can’t always see — their smiles, the joy they have for one another and for their families, and just how beautiful every single person is. Every single person is unique, valuable, and worthy, and it’s our job to show them that. If we reflect back to them a distorted image, we’re doing not only them but ourselves a disservice. Again, it comes back to intent vs. impact. Everyone has a certain style in their photography, but if your style ends up making someone look wildly different than they actually do, your intent (artistry in photography, preservation of style) doesn’t matter — your impact is still highkey racist. There are ways to preserve your style, whether that’s heavy on the warm tones or light and airy, as you work with a diverse client base, but you need to know how to capture and edit images to really preserve your subjects and accurately represent themselves back to themselves. Taking the time to really think about these things, put in the extra time at sessions to get your settings right, and taking care when editing is not only showing real care for your client, it’s working even just a little at dismantling a system that tells people with darker skin that they don’t matter as much and that real beauty only comes from having skin so white you disappear in a snowstorm.
One more thing you can do: diversify your feed. Follow more photographers of colour and people who work with BIPOC in all kinds of industries.
Oh and in case you needed reminding, Black Lives Matter.